Quick Links
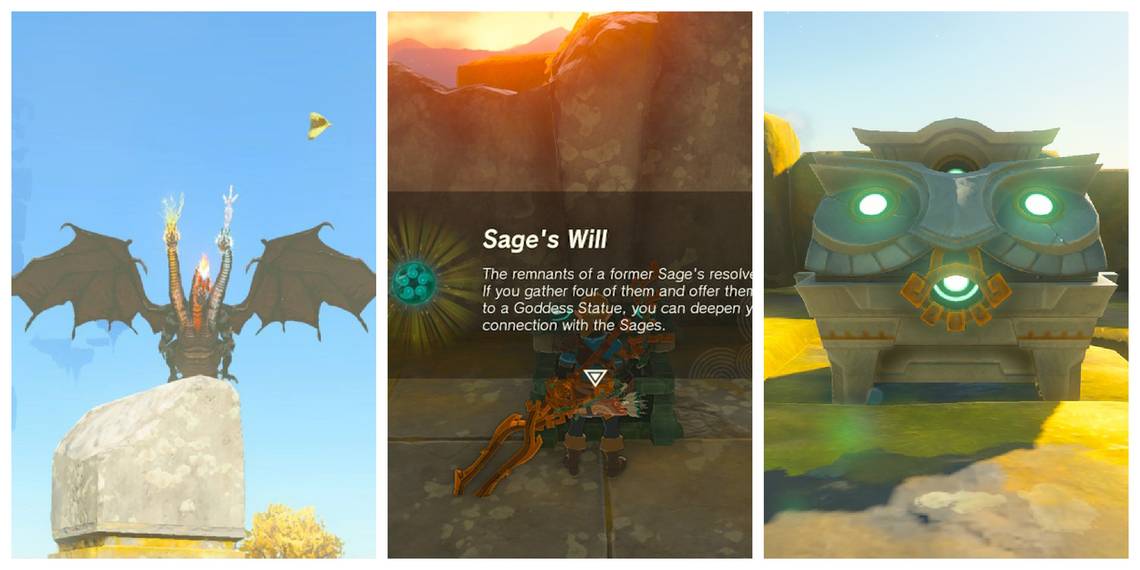
The Legend of Zelda: Tears of the Kingdom features a wide range of upgrades and boons that help Link better prepare for his journey through Hyrule. Nearly everything Link possesses, from the armor on his back to the horse that he rides, can be improved in some form. While much of this is explained fairly early on in Tears of the Kingdom, one of its key upgrades, Sage's Wills, remain something of a mystery for much of the game.
Sage's Wills are a unique upgrade material that Link will acquire while exploring the Sky Islands above Hyrule. Link can use these mysterious orbs of power to strengthen the bond he shares with the Sages he'll recruit over the course of Tears of the Kingdom. This guide will take the player through every step of collecting all 20 Sage's Wills, allowing Link to upgrade each Sage that helps him with his cause.
Updated June 11, 2023, by Christopher Norman Worcester: To find every Sage's Will, TotK players are going to have to scour the skies above Hyrule, hopping from island to island and taking on one or two truly terrifying beasts along the way. To make life a little easier, this Sage's Will locations guide has been updated with a few additional tips and tricks for those who are hoping to upgrade all of their Tears of the Kingdom Sages before completing the game.
Preparing to Search for Sage's Wills in Tears of the Kingdom

Before heading out to collect every Sage's Will, TotK players must first make sure that they are well-prepared. As such, they should consider using the following tactics while exploring the Sky Islands:
- Bring Warm Clothes/Cold-Resistant Meals
- Purchase the Snowquill set from Rito Village or cook with heat-related items.
- Bring Stamina Replenishing Meals/Elixirs
- Cook with any endurance-related item, i.e. Endura, Tireless, Stamioka, etc.
- Acquire the Autobuild Ability
- Complete Josha's quest line to acquire Link's Autobuild ability.
- Make A Simple Flying Machine
- Create a simple hoverbike, and save it to Autobuild to reuse when needed.
- Prepare for Heavy Combat
- Get multi-shot bows from Lynels and cook with Strength-related items.
Every TotK Sage's Will

In total, there are 20 Sage's Wills for Tears of the Kingdom players to find throughout Hyrule's Sky Islands, most of which are fairly easy to reach. However, Sage's Will 8 is found on a platform high above Eventide Island, and 19 & 20 are found on the Thunderhead Isles, which will be covered by a storm for most of the game. With this in mind, it is generally better to get these ones last.
Sage's Will 1: Eldin Sky Archipelago

Starting at the top of the map of Hyrule, the first TotK Sage's Will can be found in the Eldin Sky Archipelago. The island itself is low and can be reached from multiple nearby locations, including the Typhlo Ruins (Eldin Mountains) and Ulri Mountains (Akkala Highlands) Skyview Towers. Link can also use multiple shrines on the surrounding archipelagos to reach this chest, including Simosiwak Shrine (North Hyrule), Mayam Shrine (North Hyrule), and Kadaunar Shrine (South Eldin).

The chest is found in a small building in the center of the island.
Sage's Will 1 Chest Coordinates: 1765, 2267, 0827
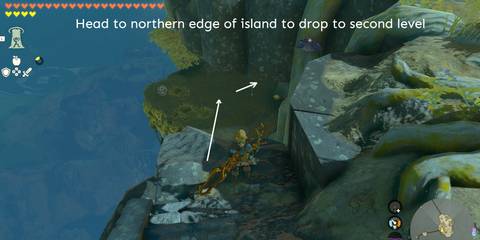
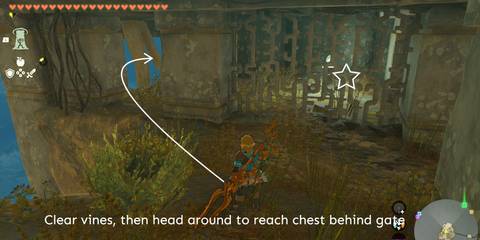
Sage's Will 2: South Eldin Sky Archipelago

Using the Eldin Canyon Skyview Tower, players should launch into the air and land on the large island that sits furthest south in the chain. Link will need to head to the northern edge of the island and drop to the second of three levels. Once there, players should look for a gated-off section covered in vines, as one section is not barred in. They'll need to clear the vines and enter the area behind the gate to find the chest.

Sage's Will 2 Chest Coordinates: 1780, 0981, 1226
Sage's Will 3: Sokkala Sky Archipelago

This chest is found in the massive floating orb found within the Sokkala Sky Islands. If Link has not completed the nearby shrine, he can reach the area from the Water Temple, or the Ulri Mountain Skyview Tower.
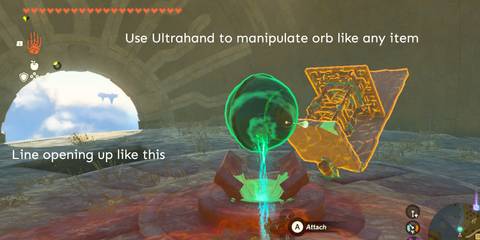
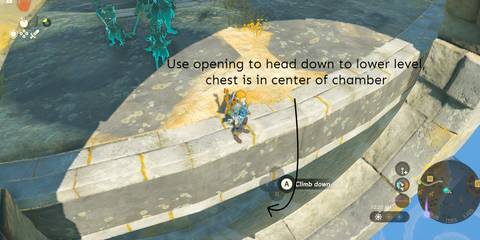
Players should enter the inside of the orb by climbing the sides, or by gliding/flying in. The chest is located on a lower level, which can only be accessed by moving the opening into a position that allows Link to enter. To do this, players will need to use Ultrahand to place the opening along the equator, or perfectly lined up with the ground that Link is on. This will allow him to head to the opening and drop to the lower level. The chest is sitting in the middle of the lower chamber.

Sage's Will 3 Chest Coordinates: 3811, 1582, 1144
Sage's Will 4: Wellspring Island - Flux Construct II

To reach the fourth Sage's Will, TotK players should wait until Link is making his way through the "Sidon of the Zora" main quest on his way to the Water Temple. During that mission, he can unlock fast-travel points at two locations: the Water Temple and Igoshon Shrine.

The chest itself is located on the shoulder of a Flux Construct II miniboss. The battle arena is found directly below the water temple. Players can look at the map to see the exact location that Link should be lined up with to find the construct. After defeating the enemy, players can recover the Sage's Will.
Sage's Will 4 Chest Coordinates: 3396, 0640, 1290
Sage's Will 5 & 6: Lanayru Sky Archipelago - Flux Construct II

Sage's Will 5: Near Jirutagumac Shrine

This chest is located inside a large orb that floats along the Lanayru chain of islands. Jirutagumac Shrine is found inside this orb, so if players have completed it, they should fast travel to it. If not, Link can reach the orb by using the Upland Zorana Skyview Tower (2866, 0581, 0379), which is located directly below on the surface.
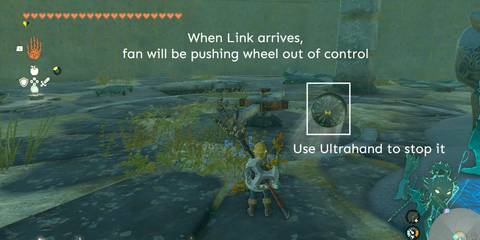
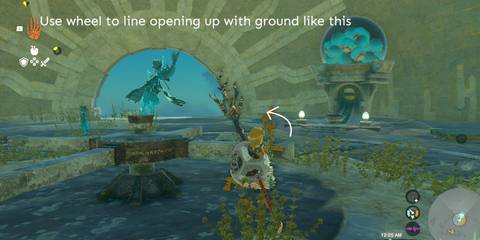
Once inside the orb, Link will see a turning wheel being pushed by a fan, causing the outer shell to constantly turn. Link can use Ultrahand on the turn-wheel, then wiggle the right stick to break the fan free. After doing so, players need to use the wheel to place the large opening perfectly lined up with the ground. Link will then head to the opening, and drop to the lower chamber to find the chest sitting in the middle of the room.

Sage's Will 5 Chest Coordinates:
Sage's Will 6: Floating Construct Arena

Just south of the orb where Link finds Sage's Will 5, he will find TotK Sage's Will 6 on another Flux Construct. He can once again use the Upland Zorana Skyview Tower (2866, 0581, 0379) to reach it. This will be another Flux Construct II battle, with the chest starting out on the enemy's shoulder.
Sage's Will 6 Chest Coordinates: 2987, -0235, 0894
Sage's Will 7: North Necluda Sky Archipelago

Looking at the small chain of islands in the North Necluda Archipelago, which sits just east of the Great Sky Island, there will be a small, circular platform at the far eastern edge. This is where Link must reach. If the Josiu shrine is not available to the player as a fast travel point, they should use the Great Sky Island as a starting point to fly or glide.

In the center section of the archipelago, Link will find a device that can launch him into the air. This mechanism will send him directly to the small island that he'll need to visit. At night, the island is very hard to miss, as it is covered in Luminous Ore. The chest will be found on the back side of the island.
Sage's Will 7 Chest Coordinates: 1935, -1064, 0961
Sage's Will 8: Over Eventide Island - King Gleeok

Getting to this island can be a considerable challenge, as the closest shrine is the Kumamayn Shrine, which is located in the Necluda Sky Archipelago. If Link has not unlocked the shrine on these islands, he can use the Rabella Wetlands Skyview Tower (2419, -2762, 0222) to reach them. From here, the best option is to load up on stamina-replenishing meals and elixirs, build a flying machine, and head out as far as possible, then glide the rest of the way if needed. Having the Vow of Tulin, which is awarded following the completion of the "Tulin of Rito Village" mission, can make all the difference in this endeavor.
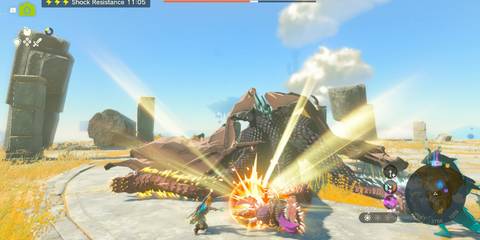
Once Link does make it to the island, he'll have to face the formidable King Gleeok. This version of the three-headed dragon uses three different elements, instead of the usual one. The key to this fight is having at least one powerful bow, like the multi-shot bows gained from a Lynel. As the King Gleeok's eyes are still its primary weak point, having a bow that fires multiple arrows at once can make the fight much easier. If Link does not possess a bow of this nature, it is better to wait until he does to head after this Sage's Will. Unfortunately for Link, the King Gleeok must be defeated to claim the Sage's Will, as the chest opening is tied to the death of the monster.
It is worth completing the "East Necluda Sky Crystal" mission to unlock the Kumamayn Shrine fast-travel point on the Necluda Sky Archipelago.
Sage's Will 8 Chest Coordinates: 4652, -3828, 1065
Sage's Will 9: South Necluda Sky Archipelago - Flux Construct III

Heading back to the same base platform that Link left from to reach Eventide Island, the next Sage's Will can be found on a much closer island in the South Necluda Sky Archipelago. Link can use the launching mechanism on the center island and glide to the desired location without much hassle.

This time around, Link will face a Flux Construct III, which is slightly tougher than the previous model but should not pose too much of a threat. Once the enemy is defeated, players can open the chest to claim Sage's Will 9.
Sage's Will 9 Chest Coordinates: 2559, -3601, 0894
Sage's Will 10: Faron Sky Archipelago - Flux Construct III

This island is located directly above Lake Hylia, and can be easily reached from the In-isa Shrine on the western edge of the Great Sky Island. Link will face another Flux Construct III, acquiring TotK Sage's Will 10 once it is defeated.
Sage's Will 10 Chest Coordinates: -0326, -2591, 0894
Sage's Will 11: South Hyrule Sky Archipelago

Link can glide to the island in the image from the western edge of the Great Sky Island, or the East Gerudo Sky Archipelago. Once on the island, Link will notice two small pools. Players should head to the lower of the two to find a tricky little puzzle.

There is a stone gate that allows the pool to drain, and Link must find a way to keep the gate up long enough for him to open a chest at the bottom of the pool. If Link heads to the upper pool, he'll see a log sitting against that pool's gate. He'll need to bring that log back down to the lower pool, stand it upright behind the gate, and then use Ultrahand to raise the gate as high as it will go before attaching it to the log. This will allow Link to have all the time in the world to open the chest at the bottom.
Sage's Will 11 Chest Coordinates: -0952, -1735, 1006
Sage's Will 12: East Gerudo Sky Archipelago

Link can get to this island by using the launch mechanism on the central island, which can be reached through the Rakashog Shrine fast-travel marker. If Link has not completed that quest, he can glide to it from the Gerudo Canyon Skyview Tower (-2438, -2182, 0307).

As Link approaches the island, he'll notice that there are three different levels. The chest is in a chamber on the bottom level, but it is locked with a mechanism that requires a beam of sunlight to hit it. Link will find several mirrors on the second level, and other various items that will allow him to complete this task. While there are surely multiple ways to do this, this guide uses only a single mirror to get Sage's Will 12.


To complete this, it must be daytime. If it is night, players should pass the time by a fire by striking flint and a bundle of wood, then sitting until morning. Once the sun is out, they can use Ultrahand to send the mirror out in an attempt to catch the sun. It's a good idea to check the height of the lock, which sits right above the door. When Link uses the mirror to reflect light back at the door, it will unlock, giving him access to the chest containing Sage's Will 12.
Sage's Will 12 Chest Coordinates: -1952, -1802, 1140
Sage's Will 13: Western Edge Battle Platform - King Gleeok

This platform is basically the same as the platform over Eventide Islands. Link must use a flying machine to cover a great distance. Link will have to head out from the East Gerudo Sky Archipelago, so it is worth it to unlock the fast-travel point at the Rakashog Shrine. This is not necessary, but will certainly help if Link should need to make the trip out to the desired island more than once.

See Sage's Will 8 for a brief description of the King Gleeok.
Sage's Will 13 Chest Coordinates: -4447, -2370, 1419
Sage's Will 14: West Hyrule Sky Archipelago - Flux Construct III

Sage's Will 14 is yet another Flux Construct II battle, found on a battle platform just east of the North Gerudo Sky Archipelago. Tears of the Kingdom technically labels this island the West Hyrule Sky Archipelago, though it seems to be the only island. There are several shrines in the area that can act as a fast-travel point, with the Ganos Shrine on the Tabantha Sky Archipelago likely the best. If Link has not completed the Tabantha Sky Crystal shrine quest to unlock Ganos Shrine, he can use the Lindor's Brow Skyview Tower (-1908, 1244, 0297) to reach the platform.
Sage's Will 14 Chest Coordinates: -2306, -0402, 0894
Sage's Will 15: Starview Island/North Gerudo Sky Archipelago

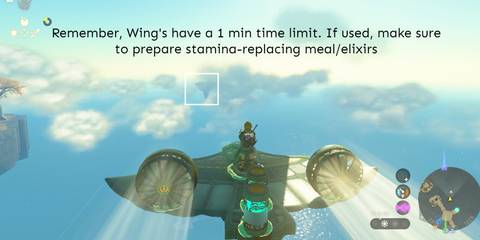
To find Sage's Will 15, Link must reach the large orb in the middle of the North Gerudo chain. This location is extremely high up, so the first goal is going to be making a flying machine that can get Link in the needed location. The simple flying machine described at the beginning of this guide works here. Players should stay away from building with the Wing, as it has a one-minute limit, which will simply not be long enough. Instead, they'll want to focus on building a small, easily maneuverable device.
Reaching the orb is just the first step, as Link will find a complex light/mirror puzzle once inside. Follow these steps to complete the puzzle:


Step 1: Head to the platform in the center that has three large beams of light coming from it. On top of that section, there will be another smaller platform with turning arms sticking out. Turning this will move the beams of light, but it also moves the mirror. Link must figure out which beam of light leaves the mirror in the correct position. Looking up will reveal a yellow lock mechanism that seems like the obvious answer.


Step 2: When the mirror on top is lined up with the yellow device, one of the three beams of light below will line up with a mirror. Players should follow the beam of light from mirror to mirror until finding the section that is not connecting to the next mirror. This will be coming from a mirror high up in the chamber, which Link can reach by using the gusts of wind. Once there, he'll see another turning mechanism. There is a clear chain of mirrors that Link must connect the light beam to.

Step 3: When Link gets to the final turning mechanism, he'll see that he can point it at the original mirror that sits on top of the central platform. Pointing the light towards that will reflect the light up to the yellow lock. However, this will reveal a shrine, not the Sage's Will. To get the Sage's Will, players should use that final turning mechanism and point the light directly onto a secret yellow lock, sitting in front of a small chamber off to the right. This will open a gate leading to the chest.
Sage's Will 15 Chest Coordinates: -3457, -0264, 1938
Sage's Will 16: North Tabantha Sky Archipelago

To find Sage's Will 16 TotK players will need to make their way to a small chain of islands above Rito Village. The island that contains the chest is on the western end of the chain, and Link can reach the area by using his Zora Armor to climb a waterfall coming down from the eastern island. If Link does not have Zora Armor yet, he can fly to the island from Lightcast Island to the south, or the Ijo-o Shrine to the north.

The chest is found in the center of the island, on display in the middle of a small ruin.
Sage's Will 16 Chest Coordinates: -3780, 1572, 1238.
Sage's Will 17: South Hebra Sky Archipelago

This Sage's Will is set up similarly to Sage's Will 16, as it is sitting out in the open, unguarded, on a small island. Looking at the islands on a map, it appears as if Link is supposed to use rails to reach it, but Link can easily fly or glide from the entrance to the Wind Temple.

If Link does not yet have access to the Wind Temple, the Rosparo Pass Skyview Tower (-3686, 2342, 0233) will work, but he will most likely have to land on the lower island to the west and use the rail system to reach the island containing the Sage's Will. Everything Link needs to make it up the rails is on the island.
Sage's Will 17 Chest Coordinates: -3705, 2150, 0648
Sage's Will 18: West Hebra Sky Archipelago - King Gleeok

This Sage's Will is found on a battle platform that is fairly high up in the sky. The easiest way to reach it is to use a simple flying machine to head up from the Ijo-o Shrine. This shrine is not connected to a sky crystal, so Link should be able to find it easily. From there, the platform can be seen in the western sky.

Once again, Link will have to face a King Gleeok. Having a good bow will make all the difference in this fight. Once Link defeats his enemy, a chest will be shown and Link can grab the Sage's Will.
Sage's Will 18 Chest Coordinates: -4471, 2172, 1253
Sage's Will 19 & 20: Thunderhead Isles

To find the final two Sage's Wills TotK players will need to head to the Thunderhead Isles, which are covered in a massive storm for most of Tears of the Kingdom. However, late in the game, a series of events leads to Link having much easier access to the area.
If players want to get these items before the storm is gone, It is actually not that difficult, so this guide will present the images in that context. However, the corresponding coordinates will apply once the storm is gone as well, so players who have already reached that point can still use them.
When flying into the storm, players should make sure to have nothing metal equipped. Lighting will become a real threat as soon as Link enters the storm. He can safely use anything made of wood, as well as anything made from Zonai technology.
Sage's Will 19: Above Guchini Plain

To reach this island with the storm still active, players should place a marker in the exact location shown in the image above. They'll need to make sure to fly well above the storm, as the island Link wants to land on has smaller islands directly below, so he can think he is on the correct mark but actually be too low.

When Link is high up, he can get a somewhat better view, but down on the island, it will be practically impossible to see anything, so the marker is going to have to be precise. The best way to do this is to place the marker on the surface level. It will still show up when Link switches the map back to air level, and he won't have to worry about it disappearing. It is also much easier to be precise with the surface map if the storm is still covering this area in the air.

The marker leads to the exact location of a breakable section of the ground that Link can use bomb flowers or a rock/boulder hammer to break through. The coordinates to this spot are 0957, -3310, 0857. Once the hole is opened, players should drop into it, but watch out for two large metal blocks and a Shock Like on the wall. Lightning will strike the blocks as soon as Link falls into the corridor.

The chest Link must find is sitting at the end of the corridor, between two Zonai lamps.
Sage's Will 19 Chest Coordinates: 0966, -3306, 0846
Sage's Will 20: Dragonhead Island

The final Sage's Will is found not far from the previous chest. Link must once again head to a specific mark and land directly on it. This time, however, the chest is on the surface of the island, so landing properly will take Link directly to the chest. It will still be extremely difficult to see though, so players should make sure the marker is placed as precisely as possible.

Sage's Will 20 Chest Coordinates: 1308, -3211, 0459
How to Use Sage's Wills in Tears of the Kingdom

Once Link has collected four Sage's Wills, he can return to any of Tears of the Kingdom's Goddess Statues and use them in a method virtually identical to the use of Lights of Blessing. However, instead of increasing Health and Stamina, Sage's Wills increase the attack power for each Sage that Link recruits. Unfortunately, this only affects attack power, and not cooldown times or any other aspect of a Sage's ability.
The Legend of Zelda: Tears of the Kingdom is available now on Nintendo Switch.