The Legend of Zelda: Link’s Awakening originally debuted on the Game Boy in 1993. Five years later it was re-released for the Game Boy Color in 1998 with a few new additions that took advantage of the new hardware’s power. And now, twenty-one years after that, the game is getting a full-on remake for the Nintendo Switch.
This is an honor that very few Legend of Zelda games have received, at least from this era. Altogether the title is twenty-six years old, which means this will be many players’ first time playing through. To help those players out we rounded up a few tips to make things easier.
10 Play The Game Docked

This game looks gorgeous both in terms of the actual graphics and the toy-like art style. However, there is a small problem. The frame rate can be pretty choppy, especially when playing on the go.
It doesn’t make the game unplayable, but the hiccups can get annoying. That’s why we recommend playing it docked, which does help. It won’t cure the problem but it at least quells it to some degree.
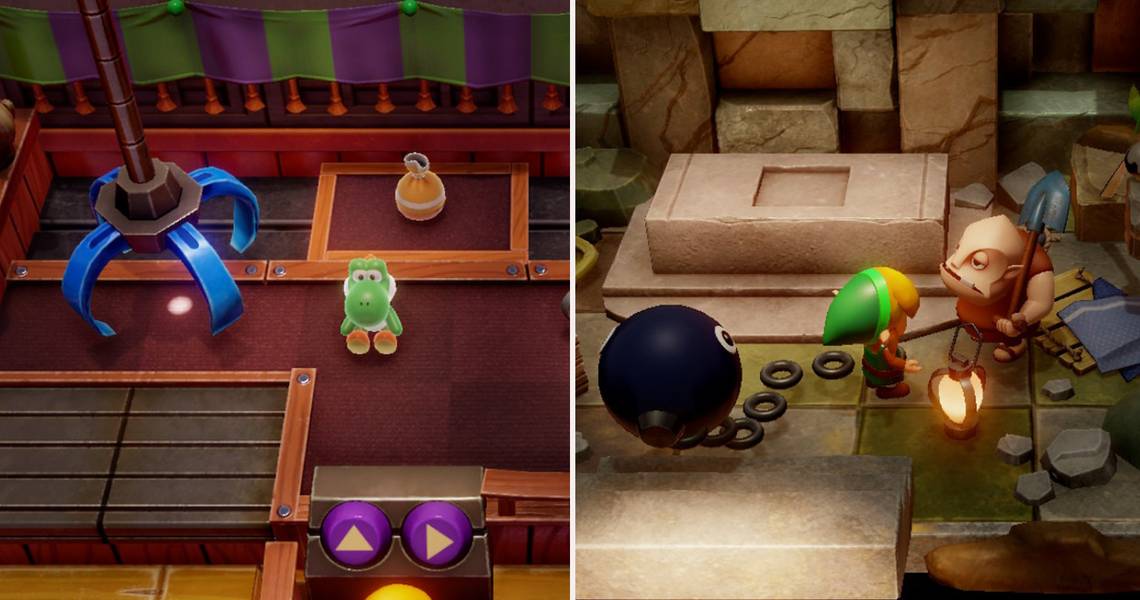
9 Master The Crane Game

In Mabe Village, where Link wakes up, there is a shop with a mini-game. This crane game mimics the real world arcade units that often rob players of their money. That is the opposite in Link’s Awakening as it is tremendously easy to get a win.
Master this mini-game early on for some good rewards like the Yoshi doll, which will start the grand trading quest along with the piece of heart container. Playing it multiple times can also be an easy way to rack up cash.
8 Save Frequently

A great way to cheat the game is by saving as often as possible. The crane game is a great example. Saving upon entering the shop is a great way to ensure that players don’t lose too much money if they're struggling with getting things right.
If something does go wrong and too much cash is wasted, it's easy to restart the game. This can apply to many circumstances as well. Even though there are auto-saves, we recommend saving manually as often as possible.
7 Your Shield Is Actually Useful

The effectiveness of Link’s shield from game to game is a toss-up. That is to say, sometimes it can be useful in battle as it has a dedicated button and other times it is just up to where the player is looking.
As great as A Link to the Past is, that lack of a button is one of its greatest downfalls. Anyway, the shield in this game is definitely worth practicing with beyond using it to get Link’s sword in the beginning, as it can be very worthwhile.
6 Purchase Tracey’s Cream

One of the earliest healing items Link can get is at Tracey’s shop. This can be found after the first dungeon. For a price, she will rub Link with her special cream. It acts like the trapped fairy in a bottle in other games in the series.
This means that if Link dies, he will be resurrected right there on the spot. Sounds like the makeup Umbrella was trying to sell in the Resident Evil movie. Is there a secret connection?
5 Explore After Every Second Dungeon

After every dungeon, the island opens up just a little more. This is because each dungeon item, like the feather, or strength bracelet, allows Link to traverse through old obstacles.
While it may be tempting to do this after every dungeon, we recommend exploring after every two. So explore after two, four, and so forth. It will save a lot of time with backtracking. Plus a lot of items require multiple gadgets. At the very least explore after the second dungeon and see where life takes Link.
4 Tinker With The Dungeon Maker

One of the newest additions to this remake is Dampe’s dungeon maker. It is nowhere near as robust as Super Mario Maker, but it is fun as an optional mode even if the rewards aren’t that great.
At the very least it is a great proof of concept to show what a true spinoff to Super Mario Maker would look like in The Legend of Zelda universe. Give it a spin, it's a great way to spend some time.
3 Use Map Markers

Part of the reason we want players to wait to explore after every other dungeon is that it is very easy to keep track of barricades and items now. That is to say with the addition of Dampe, Nintendo also put in map markers to keep track of progress.
The shapes players can use aren’t as robust as those found in Breath of the Wild, but it definitely still helps.
2 Find The Color Dungeon

Okay, so we are going to break our own rule just this once because there is an incredible item one can get after the third dungeon.
In said dungeon are the Pegasus Boots, which allow Link to dash around. In Mabe Village, there is a book in the library which Link can’t reach at first. That is until he can knock it down. In said book, is a passcode to get into the graveyard to venture into the Color Dungeon. Inside are two tunics. One will raise strength while the other will fortify defenses.
1 Become A Shovel Knight

In order to get to the second dungeon, Link has to rescue BowWow from bandits. This will then lead to BowWow eating obstacles in Link’s way. It can’t come into the dungeon, but it will be waiting outside.
Before going back to the village, explore the island with it in order to get hints for dig points. This goes along with a tip from earlier, but this one is specifically about getting the shovel as early as possible. It can lead to great loot and even extra warp points to make travel easier.