Star Wars Jedi: Survivor has plenty of collectibles, but one of the more interesting ones comes in the form of lightsaber parts. Players can search in chests all over the different locations in Star Wars Jedi: Survivor to find the many intricate lightsaber parts to create their hilt or something in homage to an iconic Jedi or Sith.
One of the more interesting lightsabers that players can find is the Edgehawk lightsaber in Star Wars Jedi: Survivor. This hilt resembles something sinister and menacing, a lightsaber one would expect from a Sith. Players will have an easy time knowing where to find the Edgehawk lightsaber in Star Wars Jedi: Survivor.
Where To Start

All of the Edgehawk lightsaber parts are on Koboh. Players will want to make their way to this planet to begin their journey. However, it’s best to keep in mind that players will need to progress through the Star Wars Jedi: Survivor story until they receive two upgrades that are essential to getting the Edgehawk lightsaber parts.
Players will need the Force Dash ability that allows them to complete dash forward in the air, reaching the otherwise impossible ground. They will also need Force Lift and Force Slam, which is also a reward whilst playing the Star Wars Jedi: Survivor campaign.
Once players have acquired these new abilities for Cal Kestis, players can head out to the Southern Reach area of Koboh in Rambler’s Reach. They’re looking for a soft patch of land amongst the cliffs, where they will find a sewer grate that needs to be opened with a Force lift. Dropping down into the sewer grate will take players to the Water Treatment Works area.
Edgehawk Switch Location

Once inside the Water Treatment Works, players need to use their lightsaber to cut the loose pipes that are blocking the path ahead. Luckily, this area is pretty small, so it’s hard to get lost, even if it is extremely dark. After cutting through the pipes, players need to head right down the tunnel, and then take another immediate right.
Be warned, there is a nasty little Rawka in need of being dismembered with a lightsaber. The Rawka is a good indication that the player is where they need to be, as it will be guarding the chest ahead that holds the Edgehawk Switch inside.
Edgehawk Emitter Location

From the Edgehawk Switch, players need to turn around and take a left Following down from the tunnel, they will now be in a large and well-lit area. If players head to the end of the room, they will see a platform that requires them to jump up to climb, right next to a scannable object for Cal’s best buddy, BD-1.
After climbing the small platform, players need to head upwards until they reach a wall that requires them to run across it. It’s an easy wall to run across, as players need to use their double jump and then maybe a Force dash to get to the other side safely. Once up and past the Force Echo, players will see a platform with no railing, and opposite in the distance, a chest that requires a double jump and a Force dash. Once on top of the new platform, players will be at the chest that holds the Edgehawk Emitter.
Edgehawk Grip Location

Directly from the Edgehawk Emitter, players want to turn around and jump back to the ledge that they jumped from originally. They will know they are in the right place as their path will be blocked by a bunch of rocks. Luckily, Cal Kestis is strong in the Force, and can easily use a Force push to clear the path and enter through the now unblocked door.
In this door is the way out of the Water Treatment Works, but more importantly, the chest that holds the Edgehawk Grip. Once this piece has been claimed, players will have 3 out of 4 Edgehawk pieces, and will now need to leave the Water Treatment Works area and head back to Rambler’s Ranch, just be careful of any of the lurking best bounty hunters.
Edgehawk Pommel Location

After obtaining the previous pieces, there is just one more lightsaber part that players need to obtain to complete the set. For this, players will want to start at Pyloon’s Saloon in Rambler’s Ranch, and head to the rooftop garden where Pili will be taking care of the many plants in Star Wars Jedi: Survivor. From here, players should climb the vines on the large building in front of them until they are on top of the orange roof.
From the rooftop, players need to run and jump across to the cliffside that sits above the Mantis hangar bay. Using a double jump and a Force dash will guarantee that the player lands where they need to go. Once here, players just need to run across to the cave where they will find a Relter nest. In this nest is a container that players need to use Force Lift and Force Slam on to obtain the Edgehawk Pommel, thus completing all parts for this lightsaber relic.
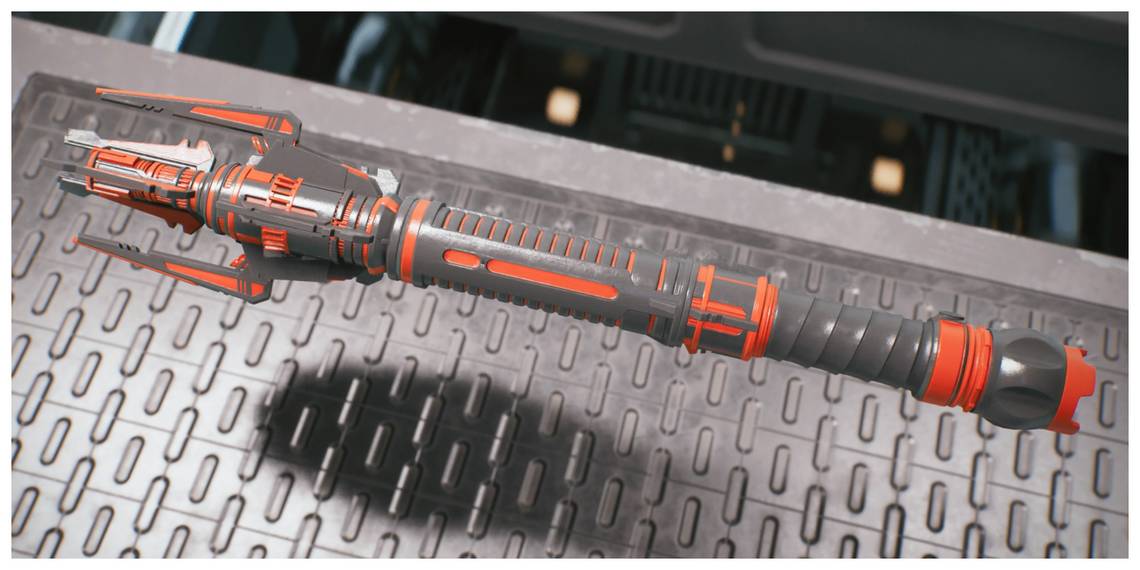
The Edgehawk Lightsaber

After obtaining all the necessary parts to forge the Edgehawk lightsaber, it’s best to head to any workshop to craft the Star Wars Jedi: Survivor lightsaber. Since players would have just acquired the Edgehawk Pommel, it’s best to just jump down from the cliff to land next to the Mantis and enter Cal Kestis’ room where they can access the workbench beside his Meditation Point.
From the workbench, players will now have all four Edgehawk lightsaber parts, where they can assemble each piece of the puzzle. With the Switch, Emitter, Grip, and Pommel in their possession, they will also have the Vents unlocked with the Claymore stance, allowing players to bring their menacing lightsaber to life, and defeat dreaded foes like Spawn of Oggdo.
Star Wars Jedi: Survivor is available now on PC, PS5, and Xbox Series X/S.