Last week saw The Bad Batch venture into one of those classic high stakes Star Wars missions which was just perfect to set up the series ahead of its two-part season finale. After all, Hunter getting captured by Crosshair and the rest of the Empire’s forces naturally means it’s time for another rescue mission.
Episode 15, titled “Return to Kamino”, starts to unveil the Empire’s plans to get rid of its overreliance on clones to fill up their battle ranks something that Crosshair really doesn’t seem to come to terms with. This is after all The Bad Batch’s purpose in the wider scope of the Star Wars universe as it continues to expand on a part of the lore that was previously left untouched as something audiences should simply assume.
Meanwhile, over at base camp the rest of the Batch starts plotting how to rescue Hunter after making sure Gregor is left with the ever-welcoming Cid, hence it's time to plan how to enter Kamino in the stealthiest way possible. In this episode, The Bad Batch takes inspiration from Hero’s Journey narrative as Omega, Hunter, and the rest of Clone Force 99 (including Crosshair) come back to the place where their adventure began, only now armed with the knowledge and character development seen in the past few months.

Luckily, Omega’s spending her childhood roaming around the Kaminoan facilities comes in quite handy to devise a way to land on the planet unnoticed thanks to a secret landing pad hidden beneath the water. The entire rainy night sequence is designed to be quite reminiscent of Obi-Wan Kenobi’s first visits to Kamino, as even the background melodies are taken from Attack of the Clones.
Perhaps even more interesting are Omega’s comments to the rest of the squad once they sneak into Nala Se’s secret lab, where she tells them this was a secret location used to create clones with deviations like the Bad Batch’s and her own. However, Omega and the returning AZI seem quite aware of the entire process, maybe hinting that she could have been an even earlier experimental subject that watched over Clone Force 99's creation, contrary to what her apparent age suggests.
As Crosshair uses Hunter’s communications device (fashioned in original trilogy design) to lure the Batch into a trap, a conversation with his former squadmate turns more interesting as he reminds Hunter that he had no option besides trying to kill his former friends back in the series’ first episode. Hunter seems quite taken aback by this, because he remembers that Crosshair’s inhibitor chip is what has been guiding his behavior along, right? Well, turns out that is not quite the case, but more on that later.
All this time Admiral Rampart has been quite busy fulfilling his duty, which translates into severing the Empire’s ties to the Kaminoans now that clones are deemed to be unnecessary. Regardless of that, there’s still room for Nala Se’s scientific knowledge in the Empire even if that’s not the case for Lama Su, who is left behind closed for the audience to assume the worst in case he never makes another appearance in the future.
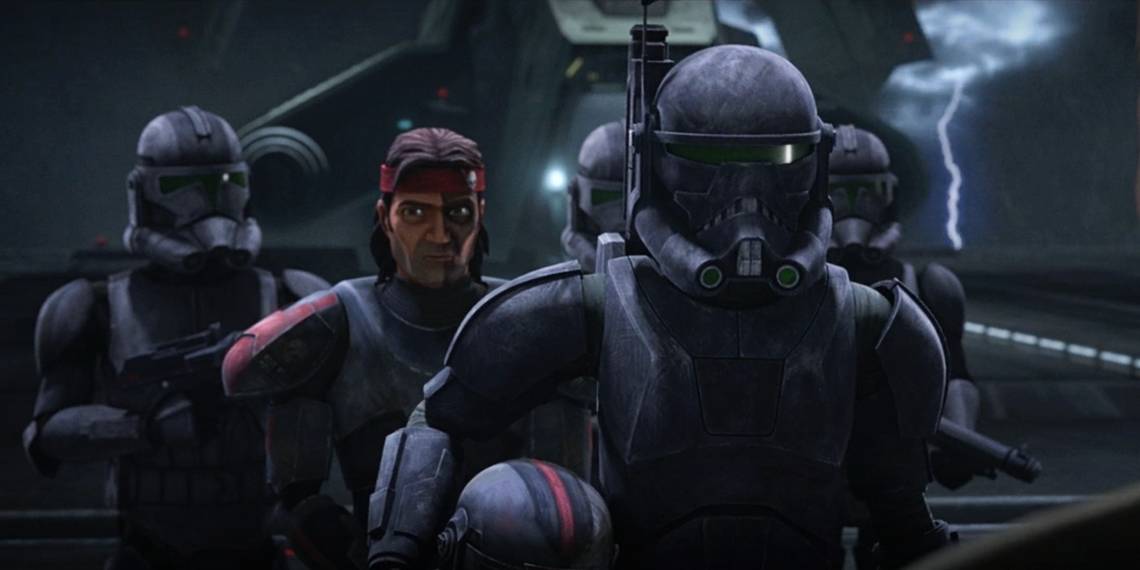
After the Batch follows Hunter’s signal right below their former training room, they decide Omega should stay behind to make a run for it in case things go wrong confronting Crosshair. As expected, Wrecker, Echo, and Tech are ambushed by Crosshair and his elite squad of non-clones but it’s here when The Bad Batch takes one of its most interesting and potentially divisive twists so far.

Apparently, while Crosshair is more than happy to be working for the Empire, he would rather be doing it alongside his clone bothers who have become way too enamored with the concept of free will for his liking. Not that he’s a complete stranger to this because here viewers find out Crosshair had his inhibitor chip removed at some point, though exactly when is not mentioned.
This plot twist does make for a great moment, yet it achieves that by basically tossing out the entire concept of inhibitor chips which are supposed to be hard to remove and the prime cause behind Order 66, despite that clearly not being the case for Crosshair. This somewhat follows the same concept teased in episodes 11 and 12, where the rogue clone commander Howzer managed to get a few more clone soldiers to drop their weapons and abandon the Empire’s ranks, just because he's a good public speaker apparently.
As Crosshair presents the Batch with one last opportunity to join the Empire and Omega’s rescue plan sort of backfires, Crosshair finally fights along his former squad to get rid of the many training droids before the episode reaches its climax. Hunter and Crosshair stand opposite to one another with the latter defending clone’s place in the Empire, all right before Hunter stuns or kills him since it’s hard to assume when blaster shots are lethal at this point.

The Batch then takes Crosshair's unconscious body with them as they try to escape the now desolate Kaminoan facility, which has been cleared for destruction per Moff Tarkin's orders to Rampart. What ensues is another beautifully animated sequence as the Batch runs across the previously brightly lit hallways that are now darkened to represent the planet's demise from Empire's incoming blasts that cap off the first half of the finale.
Next week will pick up exactly from this final scene with the Batch looking to make their escape from the planet where they were born, most likely via some type of hidden escape pod that Omega can locate. The more interesting part will be seeing how Crosshair reacts to his current situation if and when he awakens, whether the Batch somehow summons Rex to call on unpaid favors, and most importantly, how will all of this tie into the confirmed second season for The Bad Batch.