Players will unlock the Fireflow Volcano course in New Pokemon Snap once they have photographed the glowing Crystabloom and reached research level 2 in the Sands (Night) course. It's one of the shortest in the game, but still manages to pack in quite a lot of Pokemon. There are 17 in total, the vast majority of which can only be found and photographed here, making it a great place to pad out one's Photodex a little.
The course has two routes, although the second won't be available until after players have reached research level 2. From research level 3 though, they'll be able to select which one they take by scanning the area off to the right immediately after entering the volcano section of the course. There are three Pokemon that won't show up until research level 3, as well as a Legendary Pokemon that swoops down once players have completed New Pokemon Snap's main story.
Every Pokemon In Fireflow Volcano

Research Level 1
- Altaria - There's a flock of Altaria at the very beginning of the course, although the best one to photograph is perhaps the one directly behind the NEO-ONE's starting position. At research level 2, using the Melody Player in the area with the Tyrantrum will cause a flock of Altaria to fly overhead.
- Archeops - Archeops is another Pokemon that can be photographed in the opening section of the course, but there are much better photo opportunities later on inside the volcano. It shows up directly in front of players in the central chamber and then again in the final area of the default route.
- Luxray - There are a couple of Luxray in the starting area and another one later on as players enter the volcano itself. The one near the beginning on the right is probably the easiest one to get a good picture of though. If players reunite it with the lost Shinx and then throw a Fluffruit at the rampaging Tyrantrum as soon as they see it, a pair of Luxray will show up to defend them and throwing an Illumina Orb at the one furthest away will it to use Discharge for a four star photo. There's another one in the final area on the alternate route too.
- Talonflame - A Talonflame will fly over the player's head as they travel down the little incline into the area with the rampaging Tyrantrum. Another can be seen perched on a pillar in the same section of the course.
- Monferno - Shortly after the Talonflame flies overhead as they travel down the incline at the start of the course, a Monferno will momentarily hop down in front of the NEO-ONE. At higher research levels, there's a much better photo opportunity as players will pass two Monferno playing near a sleeping Tyrantrum shortly after entering the volcano.
- Graveler - Several Graveler will roll down the little inline and into the volcano not long after the course begins. They can then be found hanging from walls inside and hitting them with Fluffruit will usually be enough to knock them off. There are also some in and before the blue lava room on the alternate room and at lower research levels, one will sometimes show up in the final chamber on the default route if players knock enough Graveler into the lava on the way there.
- Aerodactyl - Aerodactyl can be seen in the skies above the starting area, but the best places to take photos of it are either in the open section with the angry Tyrantrum or in the area that houses the course's alternate exit if players scare away the two Typhlosion.
- Tyrantrum - There's a rampaging Tyrantrum in the open area just after the incline. At higher research levels, there'll actually be two of them there as well as one sleeping inside the volcano and another in the final chamber on the default route.
- Charmander - There are a few Charmander up on the rock cliffs in the open area staring down at the carnage, but players will get a lot closer to the Pokemon after entering the volcano. They show up in numerous places on both routes, so players won't be short of opportunities to get a few good pictures. There'll also be one to the player's right when they start the course at research level 3. For a four star photo, players should look for the one fighting an Archeops right before they enter the volcano as hitting it with an Illumina Orb will cause it to use Flamethrower.
- Slugma - Slugma can be found swimming around in the lava and climbing the walls in the final chamber on the regular route. At higher research levels, they'll also show up in the blue room and the chamber just after it.
- Torkoal - There's a Torkoal sleeping near the course's default exit, but players may be better off waiting until research level 2 and snapping pictures of the ones in the blue room as they'll get much better shots.
Research Level 2
- Shinx - Shinx shows up very briefly at the start of the course, but getting a decent picture here can be difficult. Thankfully, it appears in several other places too, including directly in the path of the NEO-ONE if players take the alternate route immediately after entering the volcano. At research level 3, players can reunite a lost Shinx with Luxray at the start of the course and doing so will lead to it showing up in a few places inside the volcano. If players reunite the pair and then anger the rampaging Tyrantum at the bottom of the incline, Shinx will show up with Luxray to protect players.
- Typhlosion - After taking the alternate route, Typhlosion can be found in the final chamber. Once players have seen it for the first time, one will also show up on the rocks directly above the player in the starting area and it can be photographed from both sides of the incline if players hit it with a Fluffruit when they first see it. Hitting it with an Illumina Orb when the Aerodactyl gets close to it will cause it to explode into flames.
Research Level 3
- Flareon - Players can find a Flareon in the blue room just before the end of the alternate route and hitting the nearby Crystabloom with an Illumina Orb will cause another one to show up. There's also a whole army of them climbing the winding path in the final chamber, although they're way too far away to get a decent picture of them. There'll also be one sleeping on the right side of the final chamber on the default route and waking it will cause it to approach players.
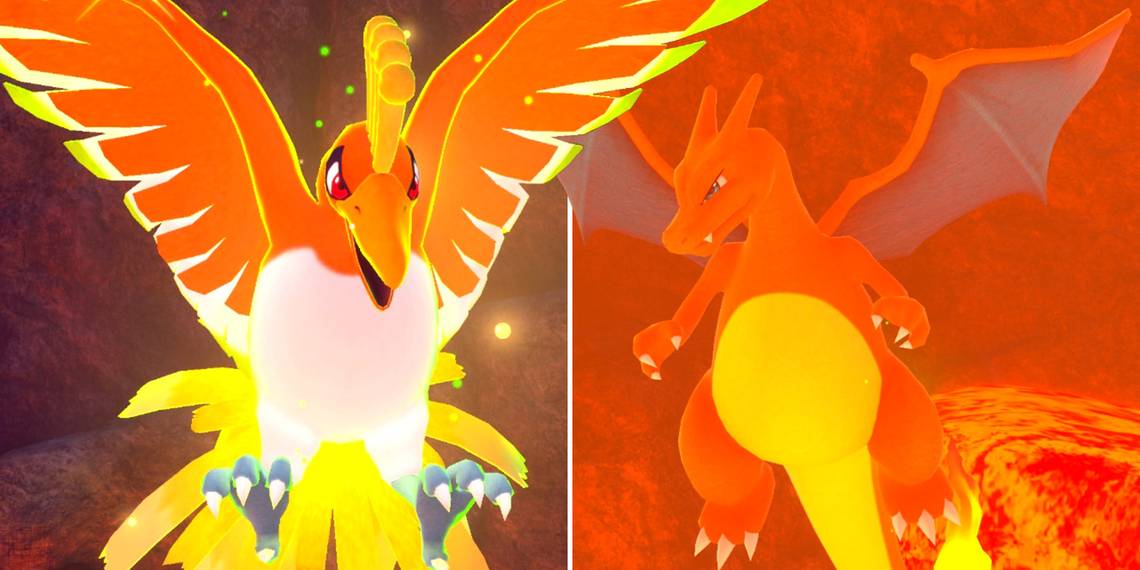
- Charizard - Once players have reached research level 3, they'll be able to find Charizard flying around in the final chamber on the regular route. It's fighting with an angry Tyrantrum, which makes for some pretty cool photographs. Another can be found by illuminating the two Charmander in the magma area before the blue lava room and then knocking the hanging Graveler into the magma with a Fluffruit. If players do this, it will also show up in the final chamber.
- Vivillon - A lone Vivillon will fly out of the ancient ruins right before players reach the end of the alternate route. Players will have to act quickly if they want to get a picture though, as the course will end just a few seconds after it appears.
End Game
- Ho-Oh - Once players have completed the game's main story, they'll be able to find Ho-Oh by turning right at the very beginning of the course and taking a picture of it through a gap in the rocks. After turning in the photo, returning to the course and photographing it again will lead to three feathers spawning in on the alternate route which players will need to hit with an Illumina Orb and then photograph. The first is on the left wall of the cavern just after passing the sleeping Shinx, the second is underneath a sleeping Torkoal to the right of the entrance to the blue lava room and the final one is on one of the nearby blue pillars next to where Charmander and Flareon are playing. If done correctly, Ho-Oh will approach players in the final chamber. Players will also be able to see Ho-Oh above the hot magma on the alternate route and, at research level 2 only, behind the Charmander in the area with the angry Tyrantrum after using the Melody Player and illuminating the nearby Crystabloom.