Highlights
- Stay vigilant in the wastelands of Fallout 4 as you encounter a diverse cast of powerful enemies, some more deadly than others.
- Use the best weapons at your disposal to face off against tough adversaries like Raiders with Fat Men and Glowing Bloodworms.
- Unlock the game's full potential by exploring hand-crafted landmarks and enjoying memorable moments while battling challenging foes.
Once the sole survivor defrosts from their 200 years of sleep and awakens to a post-apocalyptic nuclear reality in Fallout 4, they'll be forced to traverse the harsh and frightening wastelands that stretch before them. Littered with clues about what they've missed, abandoned houses, raider outposts, and even small settlements of hope, they're likely to also come across the diverse cast of horrible monsters and powerful enemies lurking in the radiation-riddled hills and forests.

Fallout 4: 10 Things You Didn’t Know Were Cut Before Release
Fallout 4 may have been a great game, but, over the years, leaks have suggested that Bethesda packed a ton of content in which never came out.Although many of these creatures are relatively easy to deal with, there are a selected few that truly make even the most seasoned Fallout 4 player tremble in their Vault jumpsuit. Players need to pull out the strongest weapons they have to deal with some of the toughest enemies in the fourth mainline Fallout entry.
Updated on March 30, 2024, by Ritwik Mitra: Fallout 4 features one of the most amazing sandboxes players can check out. The hand-crafted world is numerous steps ahead of the procedural generation everyone has lambasted in Starfield, showing just how critical it was for Bethesda to nail the thing that brought so many eyes to what they did in the first place. The sheer amount of love put into the many notable landmarks in the game is done really well and does a great job of letting players enjoy some memorable moments as they explore the landscape and encounter a wealth of challenging enemies, some of whom are more powerful than others.
21 Glowing Bloodworm
The Strongest Variant Of The Burrowing Bloodworm

- Location: In and around the Nuka-World amusement park
- Health: 230
Any enemy that burrows into the ground is a pain to deal with, and the accursed Bloodworms are no exception to this golden rule. These enemies attack a pack, making VATS the only reliable way to target them.
The toughest variant of this enemy attacks in hordes and can overwhelm players if they don't take out these foes from a distance. If players get mobbed, then they can be on the receiving end of a rather humiliating death.
Pro Tip: VATS Helps Players Locate Where These Creatures Are When They Burrow Into The Ground

Bloodworms confuse players by obscuring their vision whenever they burrow underground. If players don't want to be ambushed by a horde of these enemies, then using VATS to locate them is the best course of action to take.
20 Raiders With Fat Men
Glass Cannons Who Can Nuke Players Into Oblivion With A Single Shot

- Location: Almost anywhere in the Commonwealth
- Health: Over 45 (increases with the Sole Survivor's level)
Raiders are pretty run-of-the-mill fodder in Fallout 4, with players mowing down hundreds of these foes as they go through the game. While these enemies scale up along with the Sole Survivor's level, that still doesn't stop them from being pretty weak and easy to take out in a few shots, especially if the player has a powerful weapon. However, there is one exception here, and that's when one of these raiders has the gall to whip out a Fat Man in battle.
This weapon will obviously kill players in one shot, making it the need of the hour to take them out before they can unleash a shot from this powerful mini-nuke launcher. As iconic as this weapon may be, it's extremely frustrating to be taken out in a single shot and not be able to do anything about it. As a result, any raider with a Fat Man becomes one of the most dangerous glass cannons in the game.
Pro Tip: Prioritize These Enemies And Take Them Out Quickly

There's no point in taking cover against these enemies. Players should just rush them from the get-go and pray that they can take down this enemy before it unleashes a powerful nuke.
19 Nukalurk Hunter
A Souped-Up Version Of A Mirelurk

- Location: In various areas in Nuka-World
- Health: 470
Mirelurk hunters love to hunt down their enemies, and their Nukalurk brethren are no exception to this golden rule. The unique hue they emit makes these enemies look even more intimidating.
If players attract the attention of these enemies, then it's important to take them down as soon as possible before they pose a serious problem. Nukalurks will mob the Sole Survivor if they're too indecisive about taking these mutated lobsters out.

7 Best Fallout 4 Total Conversion Mods
Total conversion mods are massive mods that drastically change everything about a game. For Fallout 4, these are the best available right now.Pro Tip: Ranged Combat With Powerful Guns Is The Way To Go

While their spit does decent damage, Nukalurk hunters are especially deadly if players let them close the distance. This makes it important for the Sole Survivor to keep their distance if they don't want to be diced up by these damaging claws.
18 Radscorpion Predator
A Mutated Monster Who Can Rip Players Apart At Close Range

- Location: The Commonwealth, The Glowing Sea, and Nuka-World
- Health: 950
Radscorpions are some of the scariest enemies in the Fallout series. An encounter with this monster at earlier levels will lead to a player's doom as they get clawed and stabbed to death in no time.
The Radscorpion Predator has as much HP as a Behemoth, making it one of the toughest enemies to deal with. Players must keep their distance to ensure that they aren't killed in record time by these fearsome predators.
Pro Tip: Stay Out Of Melee Range At All Costs

Radscorpion Predators do serious damage from up close, no matter how strong players are. It's imperative to keep one's distance and not get too overzealous while attacking these foes.
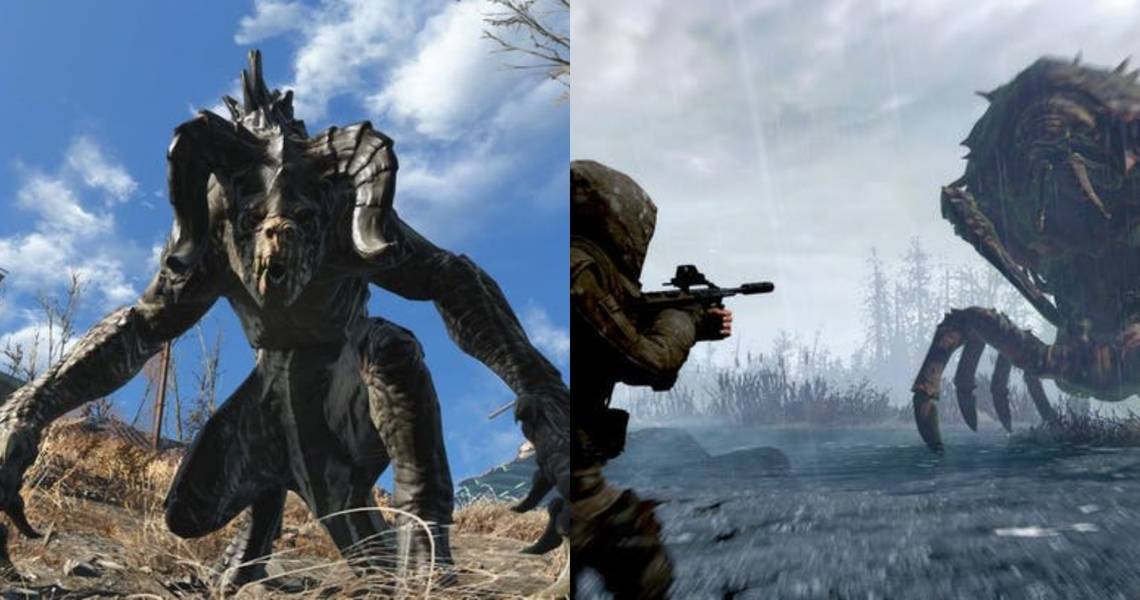
17 Enraged Fog Crawler
A Mutated Monster Who Can Rip Players Apart At Close Range

- Location: Mount Desert Island
- Health: Over 2200
Found in the Far Harbor DLC, this giant shrimp and lobster hybrid (with a hint of grasshopper in it as well) is one of the brand-new terrors players are faced with on Far Harbor island. There's even a quest that sends players to slay one of these fairly early on in the DLC.
The fog crawler is big and strong but is easily dealt with at a distance. The enraged variant, however, has much more health and strength overall, making it the worst variant to fight in the wild.
Pro Tip: Use Energy Weapons Or Armor Piercing Weapons

The enraged fog crawler has a very high damage resistance, which means it can take a long while to chip away at its health. It's a good idea to have a leveled-up energy weapon or at least a companion with a dedicated energy weapon to laser them down. The enraged variant is also immune to the Wasteland Whisperer perk, so players shouldn't attempt to tame it unless they have a death wish.
16 Venomous Angler
Sneaky Monsters Who Catch Players By Surprise And Are Always At The Player's Level

- Location: Mount Desert Island
- Health: 1750
Another monster lurking on the foggy island of Far Harbor, the angler is first encountered after arriving in Far Harbor when the town is attacked by a bunch of them. The creepy thing about these critters is their ability to camouflage in the mist, which is actually complemented by the glowing antenna that imitates the lure weed that can be harvested on the island.

Fallout 4: The 10 Biggest Plot Holes In The Game
Fallout 4 is most certainly among the most ambitious open-world gaming masterpieces, but in terms of story, there are quite a few massive plot holes.There's nothing worse than approaching a swampland to get lure weed only to run into a whole group of these awful toad-like beasts. Their venomous variant is especially dangerous since they can't be tamed with the Wasteland Whisperer perk and they always match the player's level.
Pro Tip: Use Ballistic Or Melee Weapons To Exploit Their Weakness

Venomous anglers are resistant to energy weapons, so it's better to stick to regular ballistic weapons instead. A melee weapon also does the trick, although most people would prefer to maintain their distance from this powerful enemy.
15 Super Mutant Warlord
The Toughest Variant Of A Super Mutant Enemy

- Location: Almost anywhere in the Commonwealth
- Health: Over 1535
The Super Mutant Warlord is the most powerful variant of this enemy that players can encounter in Fallout 4. For what it's worth, this enemy appears when players are at a high level, meaning that the Sole Survivor should be strong enough to take out this enemy as long as they're diligent in combat.
However, that doesn't mean that they should take a Super Mutant Warlord lightly. They hit like a truck, especially if they're kitted out with extremely damaging weapons. These enemies can take a lot of shots before going down, so the player should make it a point to hit them with the most powerful firearms they can muster if they don't want to deal with an unnecessarily protracted confrontation.
Pro Tip: Use The Strongest Weapons Possible To Take Them Down

Sometimes, the best strategy is a simple one. Unloading the most powerful weapons against this foe is the best way to take them out before things become too harrowing.
14 Deathskull Radscorpion
Massive Scorpions Who Can Burrow Into The Ground And Deal Radiation Damage

- Location: Most commonly in the Glowing Sea
- Health: For Deathskull variants, over 1115
Radscorpions might seem like a generic and boring part of the bestiary for so many players, but they rank higher simply because they're a headache throughout the entirety of the game, regardless of where the player might be — from the northern forests to even the Glowing Sea.
They're very tough, and with the ability to move underground, they can ambush the player easily. At close range, they're deadly enemies that are able to deal quite a bit of radiation damage. The Deathskull variant is the one players will want to avoid the most.
Pro Tip: Dealing With Them From Afar Is The Best Way To Avoid Their Attacks

Radscorpions are no joke. They can close the distance in no time flat and sting an enemy until they're toast. It's better that players maintain a distance and use powerful weapons to take out this foe before things get too hot to handle.
13 Nukalurk King
The Toughest Variant Of The Mirelurk Enemy

- Location: Nuka-World's World of Refreshment
- Health: 500
Mirelurks, even with their queen, sometimes feel like a lost opportunity. That is, until players fight the Mirelurk King (and more specifically their Nukalurk variant which can be met in the Nuka-Cola Bottling Plant in the Nuka-World DLC.
Even without the DLC, however, these beasts can be very scary in groups when they assault the player. They're able to attack players from afar and dish out quite a bit of damage at once due to their ranged sonar attack.
Pro Tip: Adapt To The Creature's Versatility And Unleash As Many Powerful Attacks As Possible

The Nukalurk King excels in both ranged and melee attacks. It's important to adapt to the creature's versatility and heal at regular intervals, especially if players are being mobbed by a group of these powerful foes.
12 Nukatron Sentinel
Mechanical Enemies Who Are Dangerous In A Group

- Location: Nuka-World's Galactic Zone
- Health: 420
The old Protectrons are nothing to be afraid of. They're just a bit tanky and take some time to deal with. However, once players meet the Nukatron Sentinel, they'll always have a small, permanent trauma lingering in the back of their head from being blasted with turquoise Nuka-Cola nuke juice.

Fallout 4: 10 Secrets & Subtleties You Never Knew About
Fallout 4 has many secrets and subtleties that players don't always spot the first time they play through the game...The Nukatron Sentinel is a particular variant of the Nukatrons found in Nuka-World's Galactic Zone. They can be easy to bypass due to looking like tiny Nuka-Cola machines, but when they gang up on the player that's when it gets serious.
Pro Tip: Blast Them With Bullets And Explosives Before They Can Overwhelm The Player

Going on the offensive is important against these enemies, especially if they arrive in a group. Using AoE damage to take out multiple Nukatron Sentinels at once is a great way to take out these foes without facing too many problems.
11 Super Mutant Suicider
Enemies That Carry A Mini-Nuke Around And Are Guaranteed To Kill The Player

- Location: Almost anywhere in the Commonwealth
- Health: Up to 600
These mutated humanoids are terrifying for those who are beginning their adventure across the wasteland. Already quite bulky and terrifyingly large, it doesn't help that they rush toward players upon spotting them, only to explode when in range of the player.
The mutants are equipped with a small nuke that they attempt to detonate next to the player, taking their own lives in the process. To deal with this, it's best to aim straight for the nuke from a distance and destroy it instantly for a quick kill.
Pro Tip: Sniper Rifles Are The Best Choice

Stealthy sniper character builds will have a slight edge over the suiciders. They can spot the suicider from afar by the blinking light on their arm and snipe the nuke from their location, detonating it and getting a free kill. The sniper rifle is ideal because it provides precision.
10 Nukalurk Queen
The Toughest Variant Of The Mirelurk Queen With Powerful Ranged And Melee Attacks

- Location: Nuka-Cola bottling plant in Nuka-World
- Health: 1500
This acid-spitting monster awaits the player at the end of one of the many missions and can pose a serious challenge to a novice player. Surrounded by small minions, the Mirelurk Queen at a high level, and the Nukalurk Queen have the capacity to almost one-shot the player with highly powerful acid spit attacks.
To avoid these, it's important to take cover immediately and peek whenever players can get a few shots in. As long as players keep moving and remain agile, and don't focus too much on her hatchlings, they should be able to deal enough damage on her.
Pro Tip: Use Cover And Blast The Foe With Powerful Weapons

Players fight these enemies in wide open areas, which should play into their strategy. Taking cover to avoid their ranged attacks is important, and players should definitely use their most treasured to rain hellfire down this particular foe.
9 Gulper Devourer
A Fast, High-Damage Enemy That Can Close The Distance In No Time Flat

- Location: Mount Desert Island
- Health: 1200
No doubt inspired by the giant salamander, the Gulper Devourer is a large lizard-like creature often found in the wild and highly aggressive. The creature is surprisingly fast, which can make it hard to get some distance between it and dodge its powerful melee attacks.

Fallout 4: 12 Simple Tasks That Everyone Gets Stuck On
As a huge game full of things to do, players can sometimes get caught on small but frustrating roadblocks in Fallout 4. Here's how to overcome them.On top of this, he has a large health pool that complicates dealing with it. The best way is to cripple his leg in VATS, which will allow players to determine their engagement distance properly.
Pro Tip: Approach It Like A Deathclaw

Gulper Devourers are comparable to Deathclaws in many ways, so the fight should be approached the same way. Players should keep their distance and attempt to slow the enemy down with precision shots. A VATS-centered character build is ideal for this approach.
8 Bloated Glowing One
A Monstrous Enemy That Emits Radiation And Revives Its Fallen Comrades

- Location: Almost anywhere in the Commonwealth
- Health: 400
A ghoulish, bloated corpse with a greenish glow can only mean one thing: a bad omen for the player. These humanoid monsters often hang around other fellow ghouls and emanate radiation in a radius around them, making them particularly nasty enemies to deal with.
Players won't want to hang around these guys for too long if they care about rads, but also if they don't wish to see him reanimate his friends through a special attack he's able to perform. Despite the size of his body, he can be surprisingly quick and menacing at close range.
Pro Tip: Prioritize This Enemy, Maintain Distance, And Use The Most Powerful Weapons Possible

In a group of ghouls, this foe should be the player's first priority. It hits hard and fast, with its resurrection powers being a massive pain to deal with. Rad resistance and powerful weapons are downright necessary to take this foe out before things get too tough to deal with.
7 Annihilator Sentry Bot Mk II
A Powerful, Tanky Enemy That Can Shred Players With Its Powerful Weaponry

- Location: Almost anywhere in the Commonwealth
- Health: 1045
The wasteland isn't only filled with weird mutated animals and terrifying monsters. There are also a number of abandoned hostile robots that won't hesitate to assert their technological superiority over the player if caught off-guard.
The Sentrybots are daunting enemies, capable of not only sustaining a fight for a long time but also dealing incredible amounts of damage at both close and long ranges. And if that doesn't terrify players enough, it's also highly mobile, able to run after the player easily despite its outwardly bulky-looking exterior.
Pro Tip: Wait For The Cooldown Stage

Sentry bots have a special phase they will occasionally start during combat. They will stop moving and sit still, allowing players to get plenty of potshots in. When facing a particularly tough one, try to wait for this phase to do maximum damage to it, and watch out for the final explosion when it dies.
6 Dusky Yao Guai
A Mutated Fear Who Has Ferocious And Damaging Melee Attacks

- Location: Almost anywhere in the Commonwealth
- Health: 1175
The thought of encountering a large black bear in the wild is a scary thought, but how about encountering a mutated, monstrous version of one, that's highly resistant to damage and able to dish out 200 points of damage in one melee attack?

Fallout 4: 15 Pro-Tips For Gathering Scrap & Building Materials
Fallout 4 puts a lot of emphasis on rebuilding rather than character interaction. These are some pro-tips to getting more scrap and materials!The Dusky Yao Guai is exactly that. This large bear-like creature can seriously wound a survivor not properly armored and ready for such an encounter
Pro Tip: Attack The Limbs In VATS And Don't Let It Get Too Close

It's advised here to disable the foe in VATS to reduce his speed and mobility, which will make him much easier to deal with from afar. Failing to do so can lead to players being overwhelmed by this creature's sheer size and strength in no time flat.
5 Synth Eradicator
The Highest Level Of A Synth Enemy That's Deadly In Battle

- Location: Almost anywhere in the Commonwealth
- Health: 760
The Synth Eradicator is a typical synth uprising nightmare: deadly, fast, precise, and incredibly intelligent. They're often equipped with fairly good armor and don't even appear until much later in the game due to their sheer difficulty. That being said, it's not completely impossible to defeat these guys.
Since they excel at firing, it's best to quickly close the distance and force them to fight at close range using their rather weak melee attacks. So long as players are not in their faces, however, they should stay cautious and pick their fights.
Pro Tip: Fight At Close Range To Bait The Enemy Into Unleashing A Relatively Weaker Melee Attack

The Synth Eradicator is deadly at long ranges, but this opens the door for a rather easy strategy. Players should close the distance and bait it into using a weaker melee attack that is easier to deal with.
4 Swan
A Special Behemoth That Can Smash Players Into A Pulp

- Location: Swan's Pond at the center of the Boston Commons
- Health: 1000
There's no denying that Swan is far from the most powerful Behemoth in the game. Ultra-powerful variants of this enemy such as the Ancient Behemoth boast double his health. However, what makes Swan such a huge threat is that players can encounter him at early levels in the Bostom Commons, making him a nightmare to deal with.
He can take out the player in a single hit or two if their health isn't high enough, which can make for a frustrating time. To survive this ordeal, the Sole Survivor should whip out every powerful weapon in their inventory and not worry about consuming their ammo or throwables. Fallout 4 is pretty generous with its loot, and it's confrontations like these that the game is preparing them for.
Pro Tip: Maintain A Healthy Distance And Unleash A Volley Of Powerful Long-Range Attacks

As is the case with any regular Behemoth, players should sprint away whenever Swan gets too close. This helps them avoid powerful melee attacks, and powerful long-range weapons will help whittle down his health bar until he's down and out for the count.
3 Assaultron Dominator
A Smart Enemy With Stealth Capabilities And A Versatile Offensive Moveset

- Location: Almost anywhere in the Commonwealth
- Health: 500
In the category of terrifying robot enemies, the Assaultron Dominator is the definition of a highly skilled killer. Highly independent due to its capacity to shield itself from any electromagnetic disturbances, it's also highly effective at both close range due to its deadly claws and a powerful laser weapon.

29 Mods That Turn Fallout 4 Into A (Better) Survival Game
Fallout 4 is already a pretty great survival game, but there are some awesome mods that can take your experience to the next level.The Assaultron Dominator moves quickly and even has the ability to go into stealth mode where it will appear invisible to the player, aside from a small ripple where it's located. This enemy is not for the faint-of-heart players, and definitely not one a novice should attempt to vanquish.
Pro Tip: Stay Far, And Lay Traps

The Assaultron Dominator excels in combat at every range but is particularly terrifying up close. It will try to engage with the player face to face, so keeping their distance and taking cover from its laser attack is the ideal route. Plopping down a few mines works great as well as it will deal damage to the Assaultron while it tries to close the distance.
2 Ancient Behemoth
A Huge Enemy That Is Fatal At Close Range

- Location: Guaranteed, but not limited to Fort Strong, Natick Banks, Stonehenge, and nearby Suffolk County Charter School
- Health: 1900
In terms of sheer size and force, the infamous Ancient Behemoth takes the cake. Comparable to a massive golem, these creatures often wield objects as maces and will attempt to smack or throw objects like large rocks at the player.
One hit can easily shave off a third of an unprepared player's health pool, and since they can close the distance somewhat easily with surprising speed, they're one of the worst enemies to encounter in the wasteland.
Pro Tip: Play In Areas It Can't Access

Especially early on, taking on a behemoth can seem like a monumental task. The best way to do it with bad weapons is to sit inside a small area the behemoth can't access, or on high ground, it can't reach. Scope out the area before an encounter to see what the options are, and play accordingly. A good example is this player who lures a behemoth to a bus it can't reach.