While many Destiny players are still actively trying to nail the communication and coordination that’s required to beat Oryx, the final boss in the King’s Fall raid, others are having trouble even reaching the Taken King. With a raid as big as this, one that Bungie says is the biggest they’ve ever created, there are so many choke points for teams to get caught up in, but one area that seems to be giving players trouble is the Golgoroth boss fight.
Like the Oryx fight, the Golgoroth boss battle is a test of a fireteam’s coordination and communication. It requires excellent timing, players that can remain cool under pressure, and, of course, a strong arsenal of weapons. But, even with those three elements locked down, it’s still possible for teams to get stuck. That’s why we’ve put together this Golgoroth boss fight guide to help all Destiny players take down the Ogre.
The Basics of the Golgoroth Fight
First things first, players need to know the essential pieces of the fight. They are:
Tablet of Ruin: Behind Golgoroth is a large cylindrical stone tower with six glyphs on it. This is called the Tablet of Ruin and it serves as a death counter for the fight. After each death, one of the glyphs on the Tablet will illuminate, starting from the bottom and moving towards the top. Once all six glyphs are lit, Golgoroth will wipe out the entire team. Since we are only talking about Normal mode for King’s Fall, the team must be aware of their death count.
Pools of Reclaimed Light: Shooting one of the six hanging blue orbs of water surrounding the center of the room forms these pools. Shoot one down and stand in it, and the Reclaimed Light will give players a significant damage buff when hitting Golgoroth.
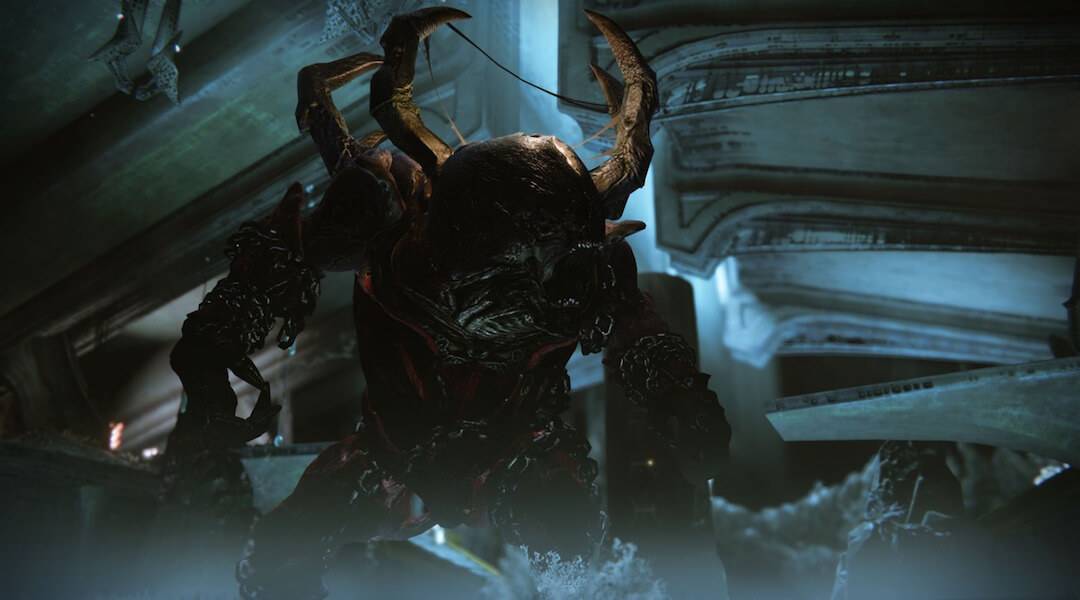
Golgoroth’s Gaze: Anytime a player shoots Golgoroth on the yellow, fleshy part of his back (sometimes it’s covered by tendrils) they will capture the Ogre’s gaze. While the player has Golgoroth’s gaze, the Ogre will face him or her and shoot Axion Darts their way. For any given cycle, Golgoroth’s gaze can be captured a maximum of six times.
Golgoroth’s Weak Point: Although the yellow exposed back of Golgoroth does offer critical damage, it’s actually Golgoroth’s glowing silver chest/underbelly that is his true weak point. However, the weak point will only reveal itself while a player has Golgoroth’s gaze.
Gaze Grabbers: These are the fireteam members who will be responsible for hitting Golgoroth’s back, holding his gaze, and making sure his weak point is facing the fireteam in the Reclaimed Light. Since Golgoroth only shoots Axion Darts, it’s important to keep a clear line of sight with the Ogre. That way the Darts will move toward the player in a straight line, making them easier to shoot. Depending on which strategy the team uses, there will either be one or two Gaze Grabbers on the team.
How the Boss Fight Works
Before going over the two main strategies when fighting Golgoroth, it’s important players know how exactly the fight works. Basically, the fight starts off with a rush of Hive enemies from the back of the room (behind Golgoroth), including a few Adepts. After eliminating those enemies, the team will then use the orbs to create Reclaimed Light pools below Golgoroth; all the while the Gaze Grabber or Grabbers are positioning the Ogre in front of the fireteam so they can hit his weak point. Once the gaze is lost, the fireteam clears out of the pit, adds will spawn again, and the cycle will repeat.
Once Golgoroth gets under 1/3 health, Taken enemies will appear instead of Hive, and they will not stop coming. Once that happens, a player should rotate to add control, while the rest of the damage team focuses on staying in the pools and hitting the weak point.
Strategy 1: Two Gaze Grabbers
Strategy 1 is what most assume is the strategy Bungie intended Destiny players to use when they first entered the Golgoroth fight. However, because it involves a lot of communication and coordination, there is plenty of room for error.
For this strategy, the team will need two Gaze Grabbers who stand on opposite ends of the raised area above the pit. The two Gaze Grabbers will coordinate grabbing Golgoroth’s gaze, while the other four fireteam members take down the orbs and do damage from within the pools. The Gaze Grabbers will need to be aware of which orbs are going down in which order, and they will need to position Golgoroth accordingly. Moreover, the two Gaze Grabbers will need to communicate their timer to the other, to ensure the gaze is passed on successfully. Once the gaze has been passed six times and the orbs are gone, the damage team should clear out of the pit, eliminate the new enemies, and rinse and repeat.
Strategy 2: One Gaze Grabber
The main difference between Strategy 1 and Strategy 2 is that there is a single Gaze Grabber and one round of damage for this one. Many prefer this strategy because it doesn’t require much movement by the damage team, coordination isn’t as involved, and it lets five players do damage instead of four. Some also think it’s safer because there is a lot less that can go wrong.
For this strategy, what players want to do is have the Gaze Grabber get Golgoroth’s gaze in front of a single pool of Reclaimed Light and stay still. The other five team members will jump into the pool and do damage (with or without the addition of a Weapons of Light bubble or a Nightstalker tether), waiting for the Gaze Gabber to count down their timer when it reaches 5. At that point, the damage team should clear out and eliminate the new enemies.
The advantage here is that once the Taken enemies spawn, the team has an extra hand to manage adds and not lose out on damage. Personally, it’s also the easier strategy to teach and has so much less room for error. Will it still be viable when King’s Fall Hard Mode launches? Probably not, so it’s best to be familiar with both strategies for now.
Regardless of which strategy the team uses, they should have an easier time besting the Ogre with some added knowledge and planning. Next to Oryx, this is probably the most difficult boss fight in the entire raid; so don’t feel bad if your team is struggling. As with any raid, be willing to experiment and switch up roles to try and find whatever works best.
Have you beat Golgoroth in Destiny’s new raid? Have you been able to complete the entire raid?